System Environments
- Intel i3-7100
- DDR4 4GBx2
- 120GB SSD, 2.5 2TB HDD, 3.5 2TB HDD
- OMV6, Debian11
- portainer/portainer-ce, linuxserver/nextcloud, linuxserver/mariadb, jc21/nginx-proxy-manager
Reverse Proxy and HTTPS
There is too much to explain about how to apply SSL and reverse proxy, so I will only explain briefly.
I plan to write a separate article about this later.
HTTPS
HTTPS is HTTP with S added, which means secure.
In other words, it means a secure connection.
If HTTPS is not applied, PWA (Progressive Web App) cannot be used and the connection is not encrypted, making it very vulnerable to security, so it must be applied.
To apply this, an SSL certificate is required, and I recommend using a free SSL issuing service Let’s Encrypt.
However, to issue an SSL wildcard certificate using Let’s Encrypt, the DNS service that you are using must be supported, and the issuance process is different for each DNS, so please search carefully in advance.
Reverse Proxy
If you want to run multiple services on one server or computer, a reverse proxy is necessary.
Previously, you had to use a port number to access a specific service, but using a reverse proxy only exposes ports 443 and 80 to the outside and allows you to access a specific service by simply entering the subdomain without the port number.
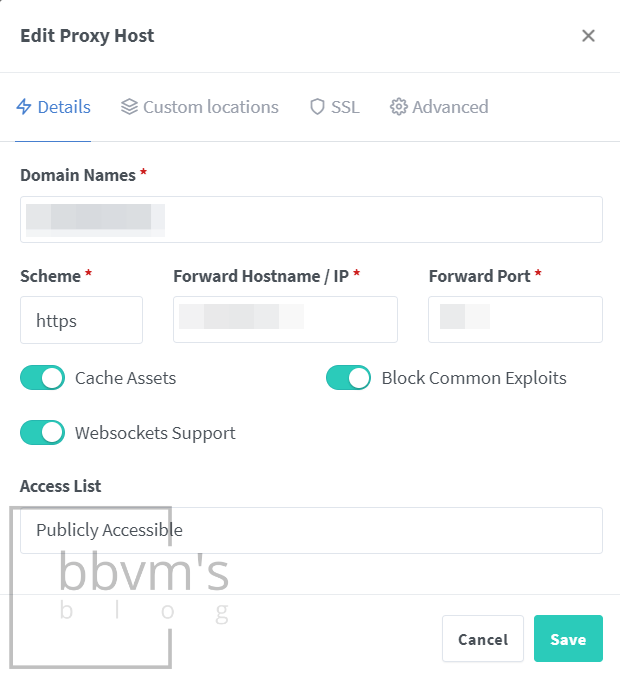
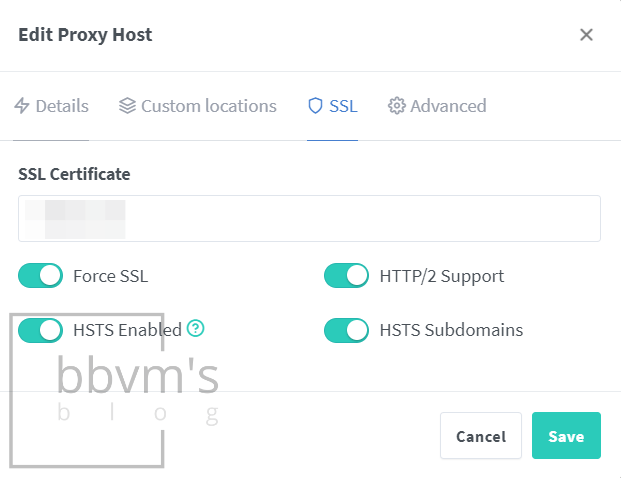
I’m using jc21/nginx-proxy-manager which has functions that contain reverse proxy, SSL certificate, Https configuration, and management.
To explain reverse proxy properly, the details would be extensive, so I only attached screenshots of the Nginx Proxy Manager settings.
Cloudflare DNS
I used DuckDNS before switching to Cloudflare DNS.
The biggest advantage of DuckDNS is that it’s free, but the disadvantages are that the DNS server is unstable and the domain must always be in the form ‘~.duckdns.org’.
After using it for about a year and a half, I recently purchased a new domain and moved it to Cloudflare DNS.
Cloudflare DNS, like DuckDNS, also can be used for free.
A big advantage is that even free users can use security services such as bot blocking and DDoS attack mitigation services.
Like DuckDNS, DDNS can be set up (though it’s not simple), and Let’s Encrypt wildcard certificates can be issued, so I recommend using Cloudflare DNS if possible.
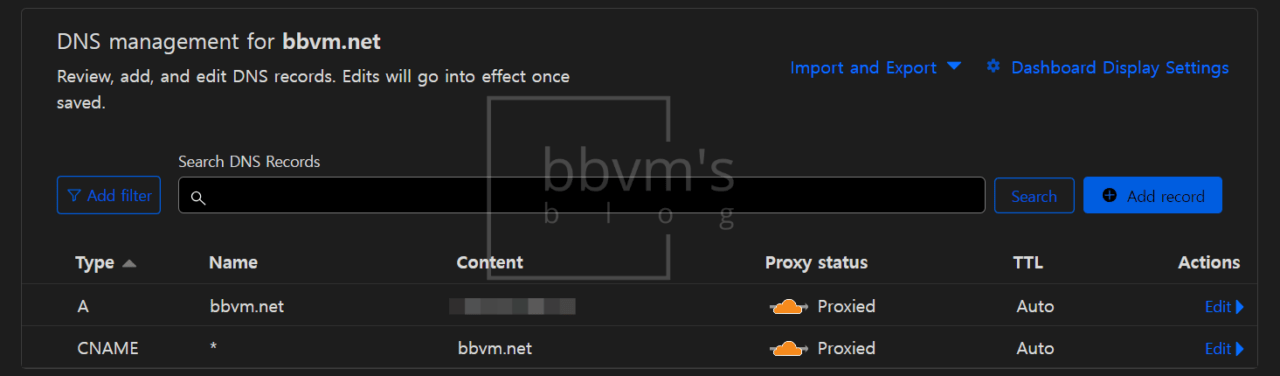
This is the DNS management screen.
The domain is set to an A record, and the subdomain is set to CNAME to point to the main domain.
This is convenient because you only need to update the IP of the main domain to implement DDNS.
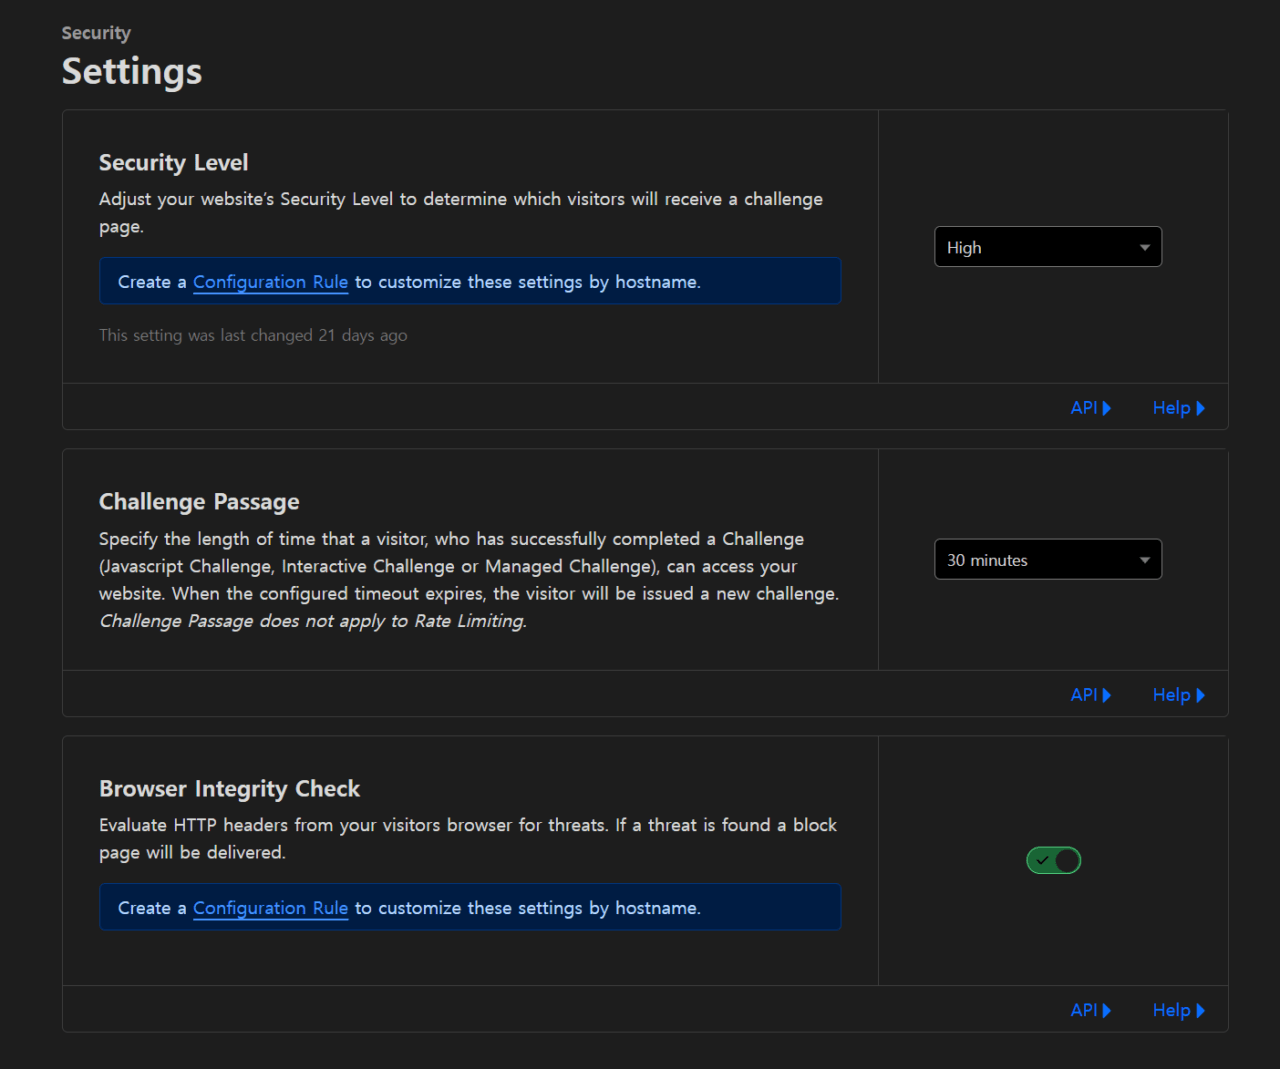
On the Cloudflare dashboard, set the Security – Settings tab as above.
I set the security level to high.
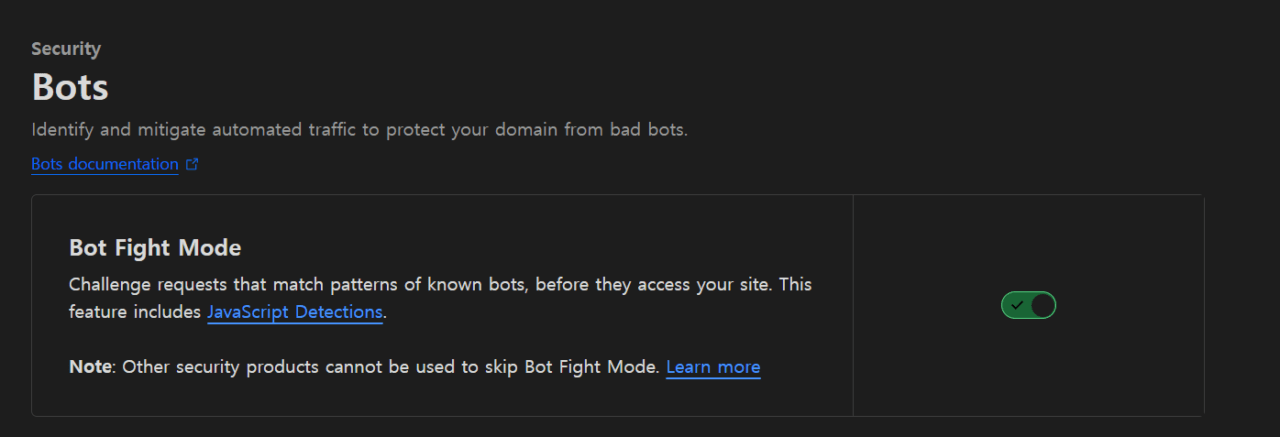
Turn on the ‘Bot Fight Mode’ on the Security – Bot tab in the Cloudflare dashboard.
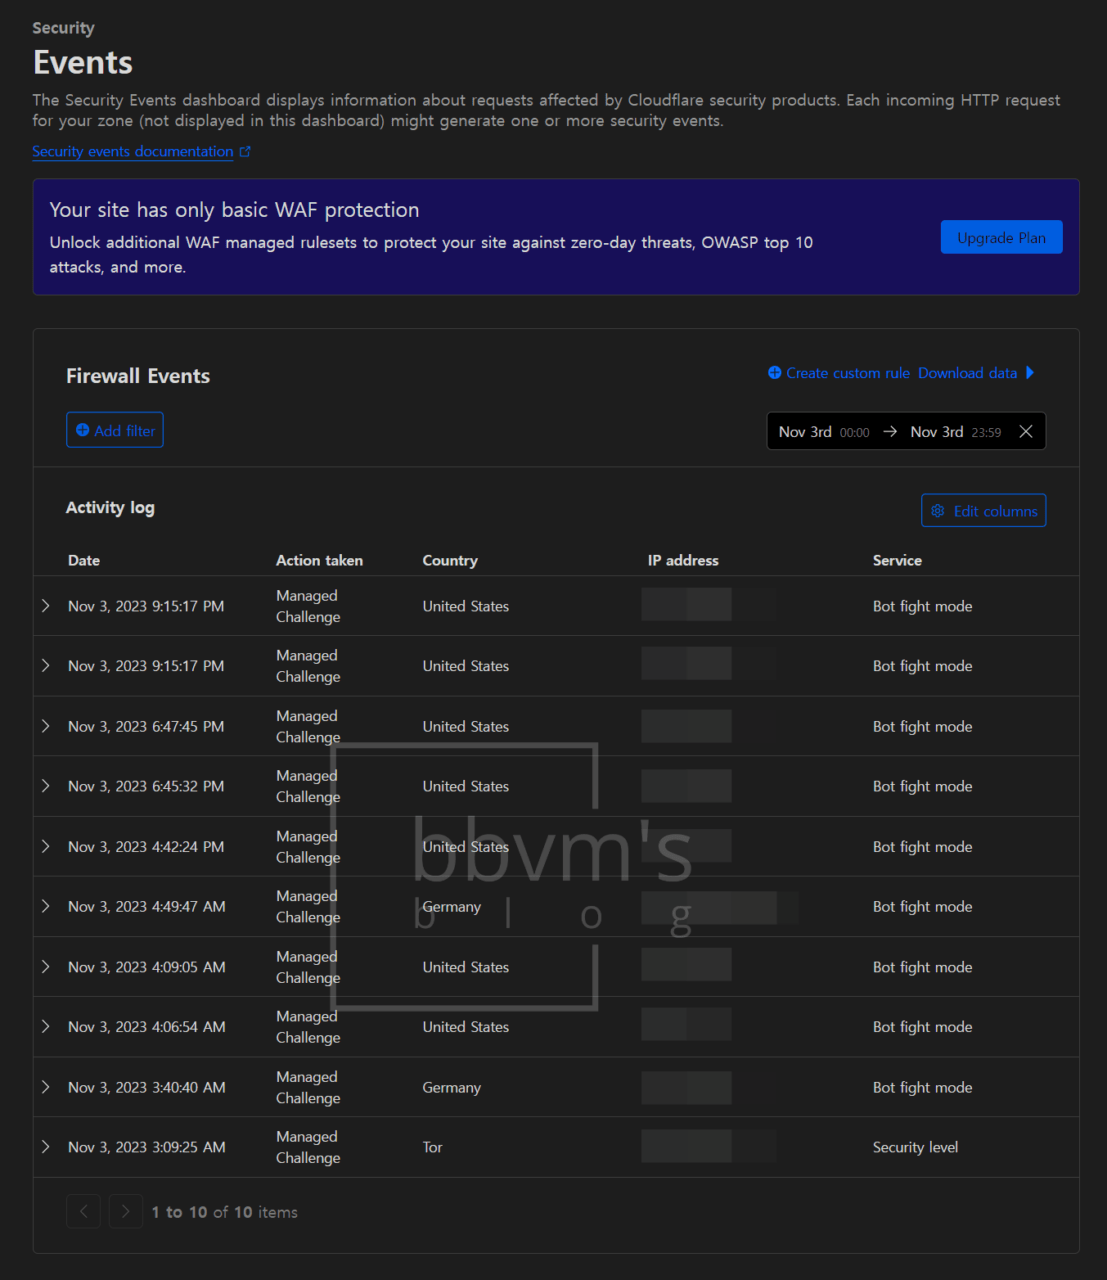
Turning on this feature blocks bots and Tor access, as you can see in the screenshot below.
GeoBlocker
GeoBlocker is an app that can be installed from the Nextcloud App Store and can block or delay logins based on IP location.
Installation
Install GeoBlocker from Nextcloud on the Apps – Security tab.
Settings
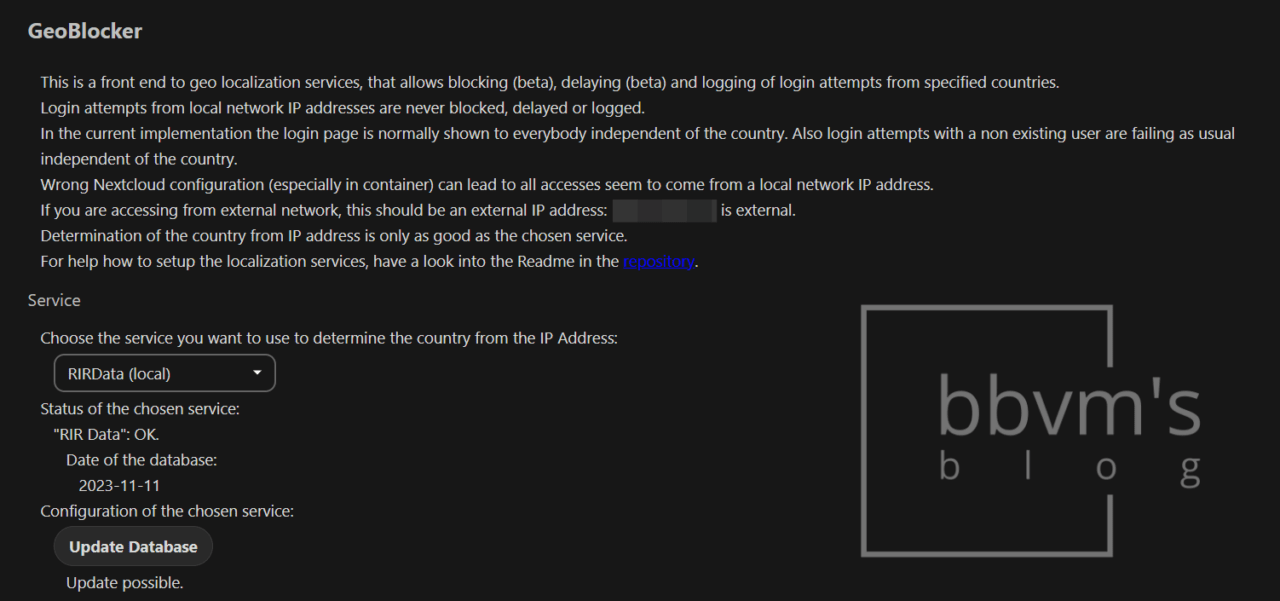
After installing the app, if you go to the administrator settings page, there is a GeoBlocker tab.
Select RIRData (local) for the database and update the database.
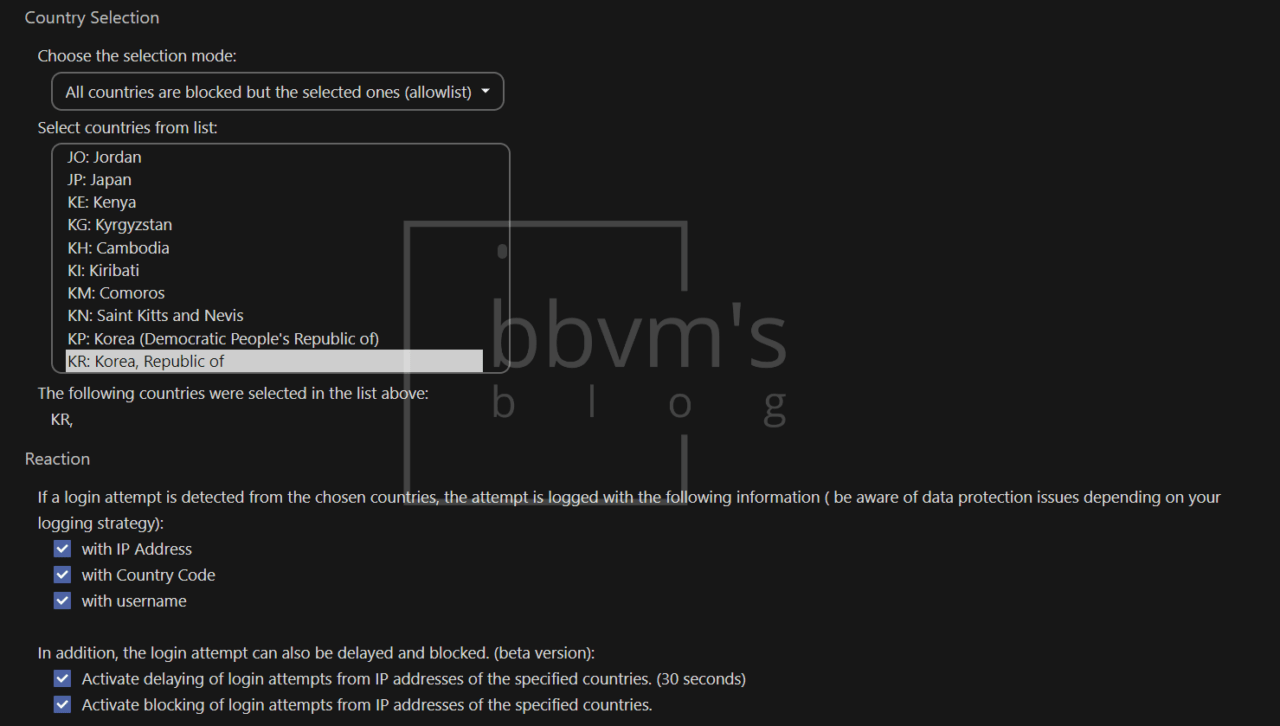
Choose one of two country selection modes.
Whether to allow access only from selected countries or block access only from selected countries.
I wanted to block access from all countries except South Korea, so I set it as above.
If you want to select multiple countries, just hold down the Ctrl key and click on the countries.
You must check the IP address, country code, and user name so that all three pieces of information can be recorded in the log.
The login delay feature forces the app to load for 30 seconds when attempting to log in from an IP address in a blocked country.
The IP blocking function blocks login attempts when logging in from an IP address in that country.
Regarding the login blocking function, as it operates at the front end, it can only protect against attacks that involve guessing and attempting to access using the ID and password.
If you select both the login delay function and the blocking function, even if you enter the correct ID and password, if you try to log in from an IP in a blocked country, it will take 30 seconds to load and then a page informing you that the login has been blocked will appear.
Set up Automatic DB Updates
To explain based on OMV, go to System – Scheduled Tasks and create a schedule as shown in the screenshot below.
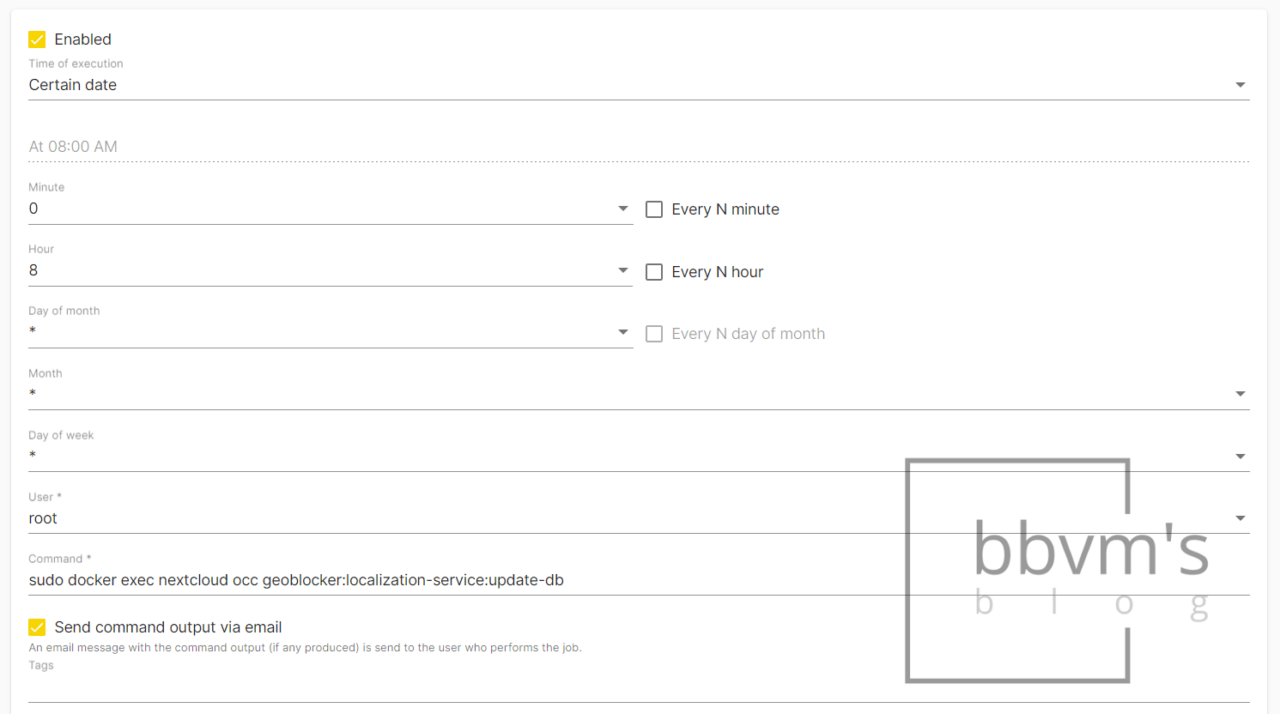
I set GeoBlocker DB to update every day at 8 AM and then send the results by email.
The command uses the following:
sudo docker exec (nextcloud container) occ geoblocker:localization-service:update-dbNote
- This does not permanently block the IP.
- There is a bug in which the database update does not end if the Nextcloud container, Mariadb container, or system is stopped or restarted during the GeoBlocker database update.
It’s possible to fix this by initializing the RIR database with the occ command, but be as careful as possible.
2-Step Verification
OTP
When I first started using Nextcloud, I had to install this app separately, but now it seems to be installed by default.
The name of the app is Two-Factor TOTP Provider, and it has a recommendation mark.
To set it up, activate TOTP in Settings – Security (Personal) tab.
For OTP apps, I recommend Bitwarden or Google OTP.
Install Two-Factor Email from the Store Security tab.
Afterward, set up email two-step authentication on the Settings – Security (Personal) tab.
Brute-Force Settings
By default, Nextcloud includes features to mitigate brute-force attacks.
However, this sometimes causes login errors and blocks my IP as an administrator, so it is necessary to add an IP whitelist by installing the Brute-Force settings app.
I don’t know now, but when I first installed Nextcloud, the app was installed but not activated.
After activating it, set the ‘Random IP assignment allow list’ in the Settings – Security (Administrator) tab.
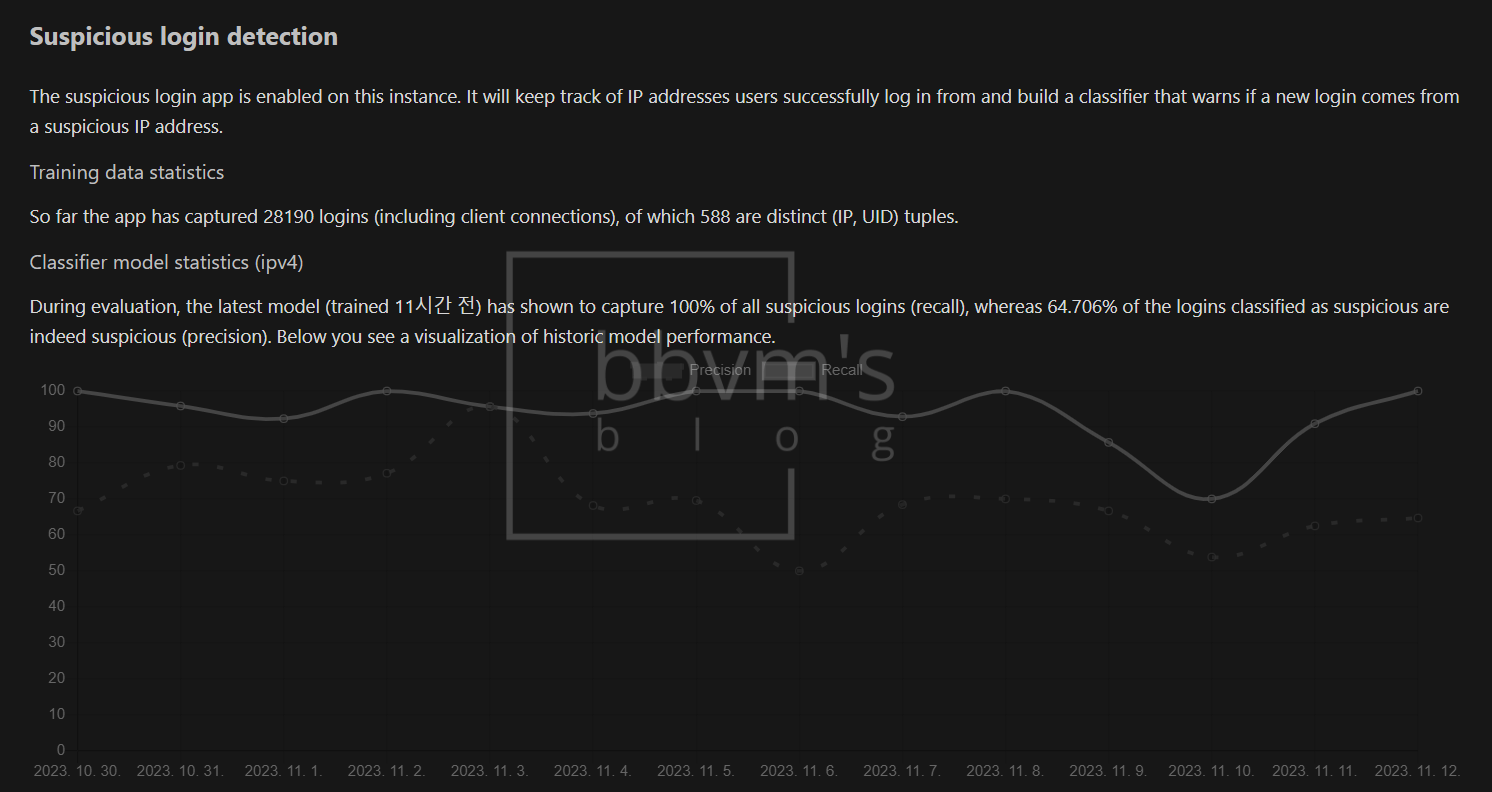
Suspicious Login
This is also an app that should have been installed separately when I first started, but it appears to be installed by default now.
There is no need to set anything separately, and after first installing and activating the app, a 60-day data learning period is required.
After 60 days, actual login detection begins.
Originally, failed logins were displayed in the system log, but successful logins were not recorded.
This app is intended to complement this, and even if the login is successful, it will log into the system and send a notification along with the IP.

Nextcloud Fail2ban
GeoBlocker can only block logins from the IPs that are not in the selected country.
Since login attempts using the VPN in the selected country often occur these days, I strongly recommend installing Fail2ban, which blocks IP access if login fails more than n times.
Blocking an IP with Fail2ban is the most effective way to block an IP because it is linked to the server firewall and the IP can be completely blocked from your server.
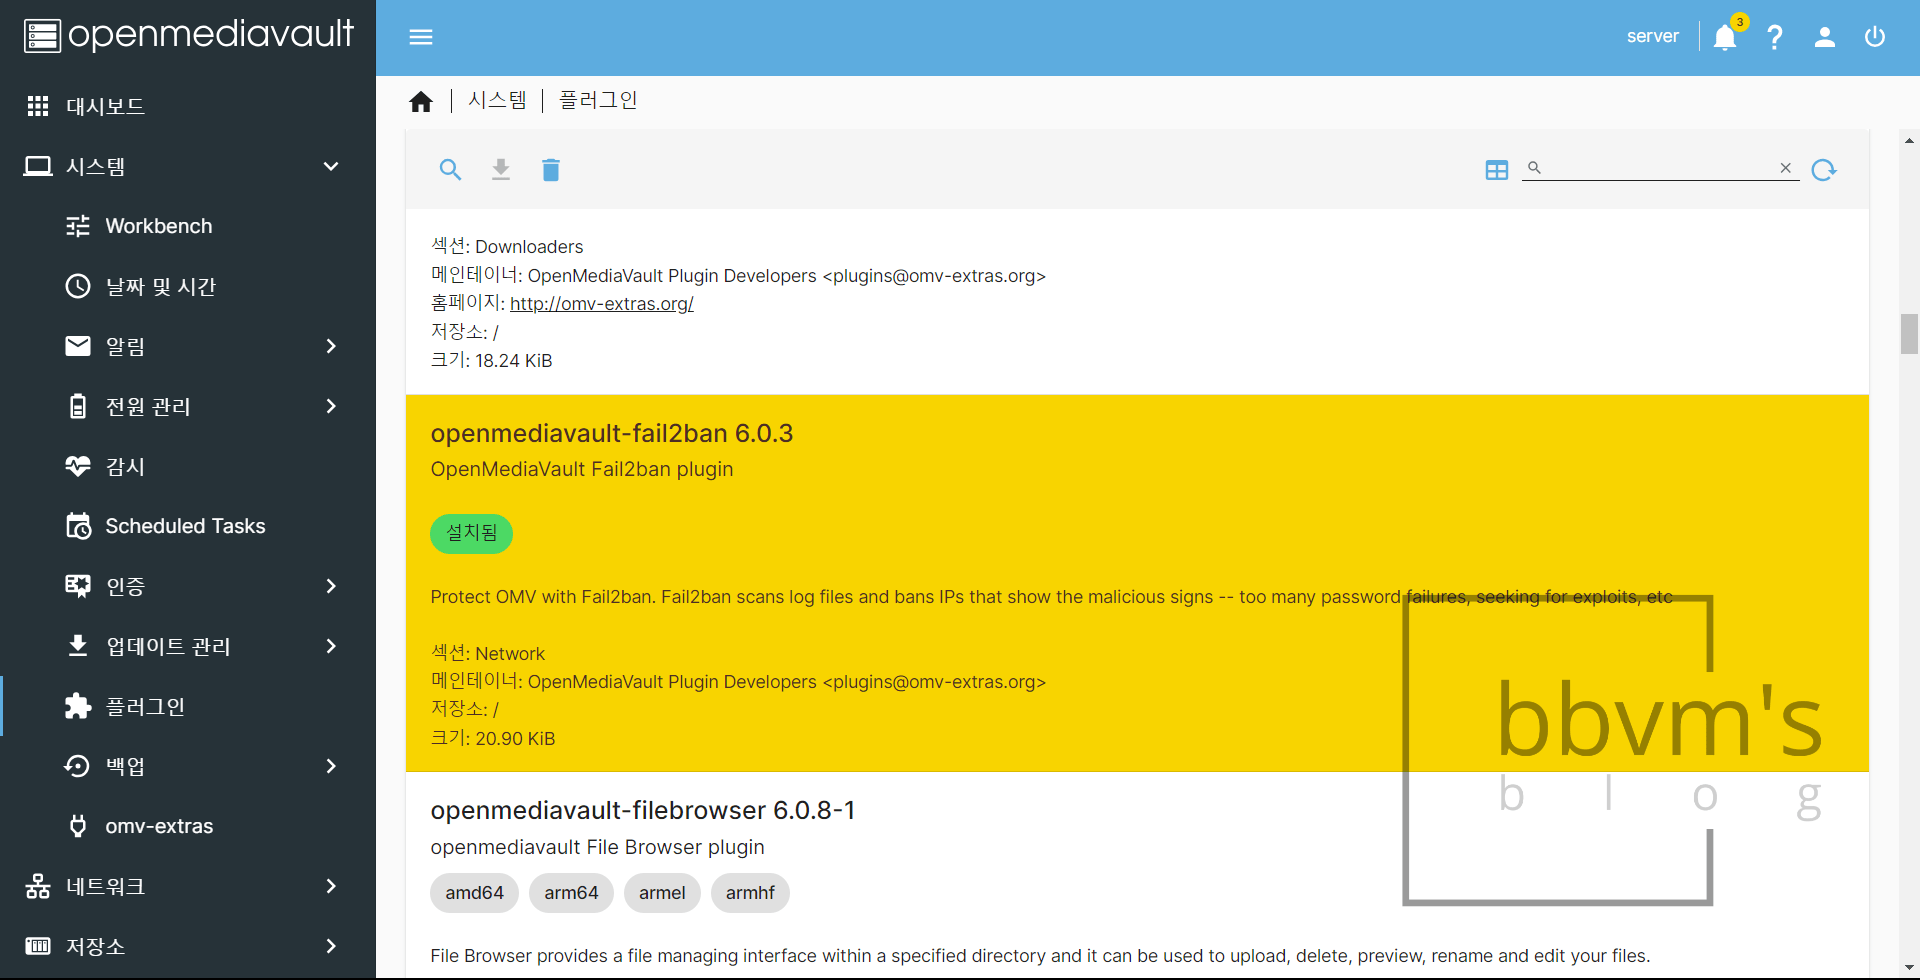
Installation
If you are using OMV, install it as a plugin.
Settings
Connect to the server SSH using a program such as Putty.
After that, enter the following command to create a Fail2ban filter for Nextcloud.
sudo touch /etc/fail2ban/filter.d/nextcloud.conf
This creates a file ‘nextcloud.conf’.
Enter the following command to open this file with Nano Editor.
sudo nano /etc/fail2ban/filter.d/nextcloud.conf
After opening the file, copy the following content and right-click to paste it.
[Definition]
_groupsre = (?:(?:,?\s*"\w+":(?:"[^"]+"|\w+))*)
failregex = ^\{%(_groupsre)s,?\s*"remoteAddr":"<HOST>"%(_groupsre)s,?\s*"message":"Login failed:
            ^\{%(_groupsre)s,?\s*"remoteAddr":"<HOST>"%(_groupsre)s,?\s*"message":"Trusted domain error.
datepattern = ,?\s*"time"\s*:\s*"%%Y-%%m-%%d[T ]%%H:%%M:%%S(%%z)?"
Press Ctrl+X, then Y and Enter to save the file and exit.
Now open the OMV panel and install the Locate plugin in the same way you installed Fail2ban.
It is a plug-in that finds the path of a file.
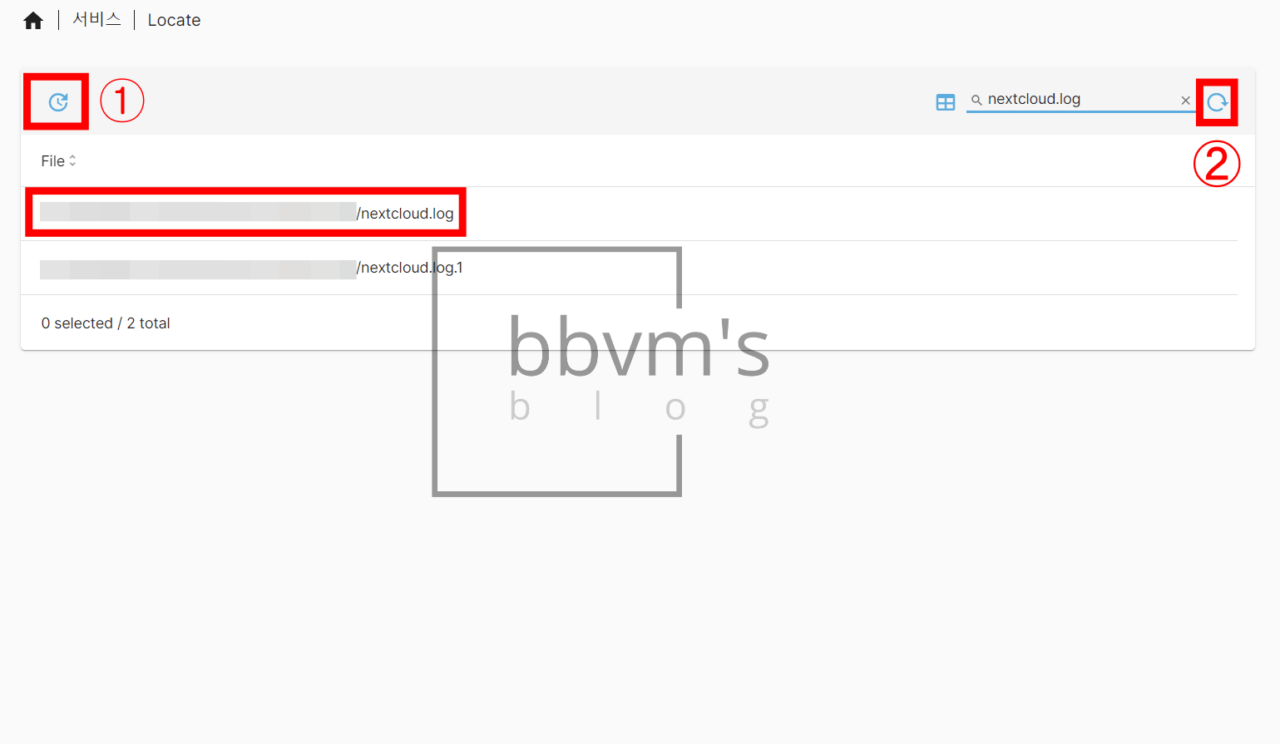
Search ‘nextcloud.log’ in the Service – Locate tab.
Then, two search results will appear, but copy the full path of the ‘~.log’ file, not ‘~.log.1’.
If you search a file name in Locate and an error appears and the search is not possible, click box 1 (an error may also appear at this time, but ignore it) and then click box 2 and the search results will appear normally.
Now, go to Service – Fail2ban – Settings tab and set as shown in the screenshot below.
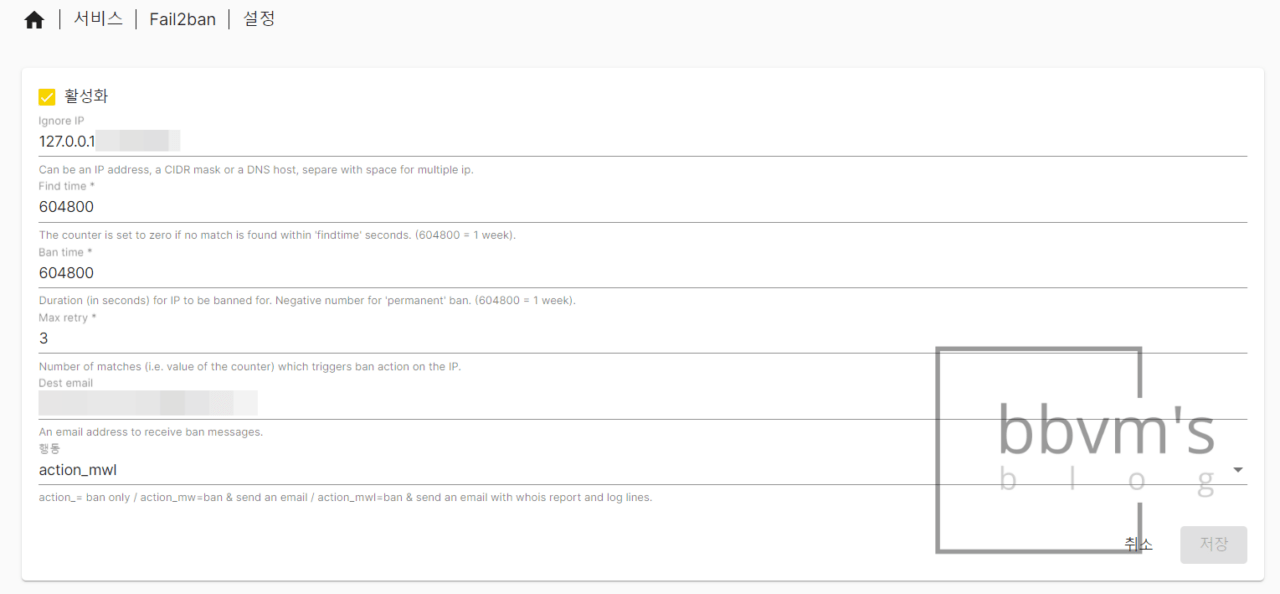
For Ignore IP, enter the local IP you usually connect to prevent an unexpected situation.
In Dest email, enter the email to receive Fail2ban notifications.
Now, go to the Fail2ban – Jails tab and create a new jail as shown in the screenshot below.
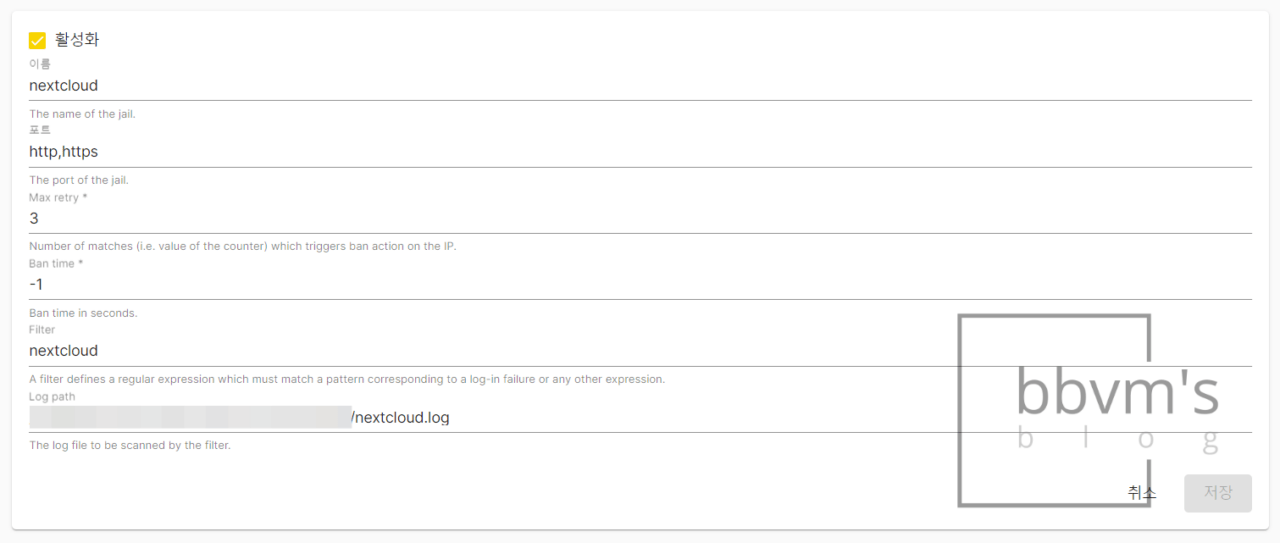
Name it whatever you want,
The port is http,https (there must be no spaces before or after the comma),
If the ban time is set to -1, it will be blocked forever.
The filter is nextcloud (without ‘.conf’)
For Log Path, paste the path copied from Locate earlier and click Save.
Finally, open SSH and enter the following code.
sudo nano /etc/fail2ban/jail.local
This will open a file. The contents of the file should look like this:
[DEFAULT]

chain = FORWARD
If you don’t do this, even if you receive a notification that your IP has been blocked by Fail2ban, it may not be blocked immediately and the blocking may be delayed.